Want to know how to delete A Flipkart account permanently? If you follow the process I’m explaining, your account will be deleted within 5 minutes. However, before proceeding, you should note that once the account is deleted, you will no longer have access to your previous data. So, make sure to save all your important information, such as order history and invoices, before starting the process.
Step-by-Step Process to Permanently Delete Your Flipkart Account
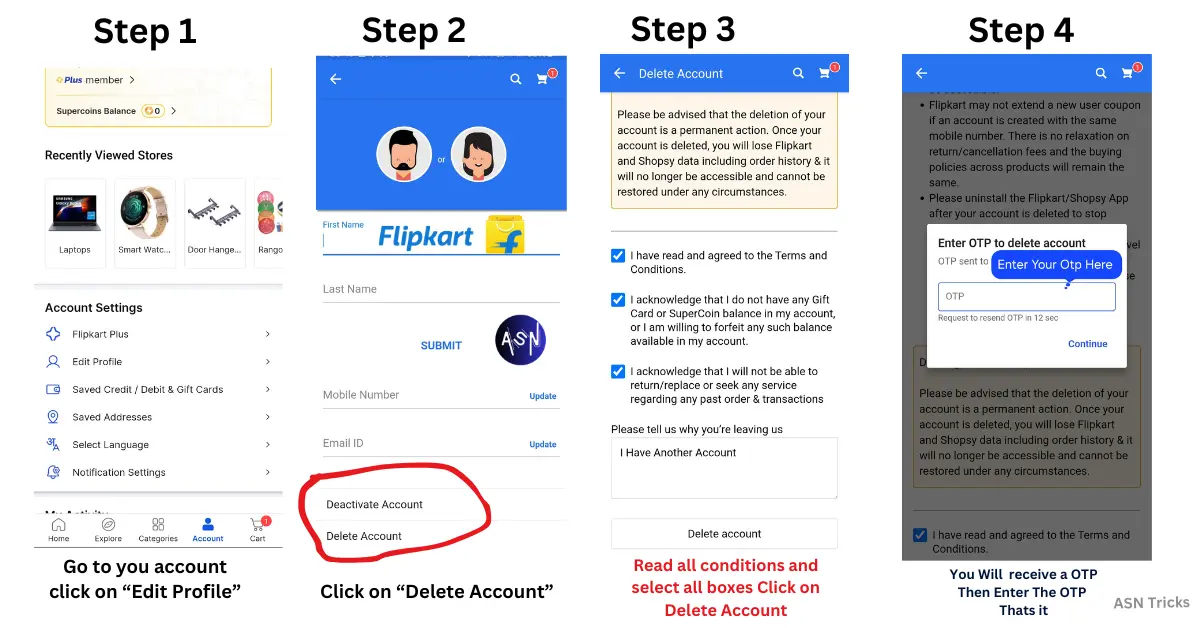
Open Flipkart and Access Your Account Section
- Open the Flipkart app or visit the Flipkart website on your browser.
- Go to your account section, find the Edit Profile option, and click on it.
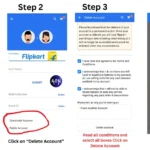
Navigate to Delete Account
A new page will open. Scroll down until you find two options:
- Deactivate Account
- Delete Account
Click on Delete Account.
Review Guidelines and Confirm Deletion
- A new page will open displaying the guidelines for deleting your account. Read them carefully before proceeding.
- Select all the checkboxes to acknowledge that you have read and agree to the terms.
- Click on Delete Account.
Note: Store or save your important data like order history, invoices, and subscriptions. Once the delete request is submitted, you won’t be able to access the old data of your account.
Verify Your Request with OTP
- After clicking Delete Account, you will receive an OTP (One-Time Password) on your registered mobile number.
- Enter the OTP in the designated field and click on Continue.
- That’s it! You have successfully deleted your Flipkart account.
If you follow the process outlined above, you can permanently delete your Flipkart account in just a few minutes. Remember to back up any important data before proceeding, as you will lose access to your account information once the deletion is complete.
How to Delete a Flipkart Account on iPhone (iOS)
If you’re using an iPhone, you can easily delete your Flipkart account by following the same steps. Open the Flipkart app, go to your account section, select Edit Profile, choose Delete Account, and complete the verification with the OTP sent to your mobile number. Ensure you back up any important data before proceeding to successfully remove your account.
How to Delete a Flipkart Account Without Phone Number
If you no longer have access to the registered phone number, you can still request account deletion using these methods:
- Log in using your email ID (if your account is linked to an email).
- Follow the same steps as mentioned above in the ‘Help Center’.
- If you cannot log in, send an email to [email protected] with your registered email, stating your request to delete your account.
How to Delete a Flipkart Seller Account Permanently
If you are a Flipkart seller and want to delete your Flipkart Seller Hub account, follow these steps:
- Clear pending orders and payments – Ensure there are no active orders.
- Go to Flipkart Seller Support.
- Click on ‘Contact Us’ and select ‘Account Deactivation’.
- Provide a reason for closing the account.
- Submit the request and wait for Flipkart to process it.
Note: Once your seller account is deleted, you cannot create another seller account with the same email or phone number.
Flipkart Deactivate Account vs. Delete Account
- Deactivation: This is a temporary process; you can use the account again anytime by logging back in.
- Permanent Deletion: Flipkart will delete all your data and remove your account. Once your account is deleted, you will not be able to access it again, so before deleting, save the data you need such as order history, invoices, etc.
If you plan to return to Flipkart later, consider deactivation instead of permanent deletion.
How Long Does It Take to Delete a Flipkart Account?
Flipkart usually takes 7 to 14 days to process account deletion requests. You will receive an email confirmation once your request is completed. If your request is taking longer, contact Flipkart Customer Support.
Final Thoughts About Flipkart Account Deletion
As mentioned above, you can easily delete your Flipkart account permanently. However, before proceeding with the deletion, make sure to store all your data. Once your data is safely backed up, you can start the deletion process.
for more useful easy tech tricks bookmark our website